Evaporating image multi-user website with polytope
Imagine you’re stumbling upon a screen with a QR code nearby
Say, you’re walking down the street and you see a screen that is almost empty, but there’s just one thing there that looks somewhat familiar. Hey, you’re correct, it’s a glider!

Glider next to suggestive QR code
If you look at the glider closely enough, you can see there’s a QR code right next to the glider (the QR code above is for illustration only and would not lead anywhere). So, what would happen if you scan the QR code? Well, something changes:
Glider with some disappearing pixels.
⚠️ Click here if the above image not showing for you or if you prefer GIFs over APNG
You can almost make out the parts of the animal, but it’s not enough, and you probably need more people to make it work, and before you know it, the image fades away! In order to uncover more of the image, you would have to find more people and ask them to scan a QR code together, it seems. See how this tricks you into social interaction?
Okay, but how can this be implemented?
🧑🏻💻 ENOUGH CHAT, SHOW ME THE CODE -> github repo
Thanks to a recent Cillers hackathon, I learned about a nice tool called Polytope which is basically a neat k8s/docker-compose wrapper that allows you to create and manage infrastructure. As of May 2024, the project is under heavy development so there’s a) not much documentation, and b) many hidden features. I wanted to estimate this tool for my own project and how it can be used with the tools I typically use, so I decided to build a small project from scratch, and here’s how I ended up with this disappearing image project.
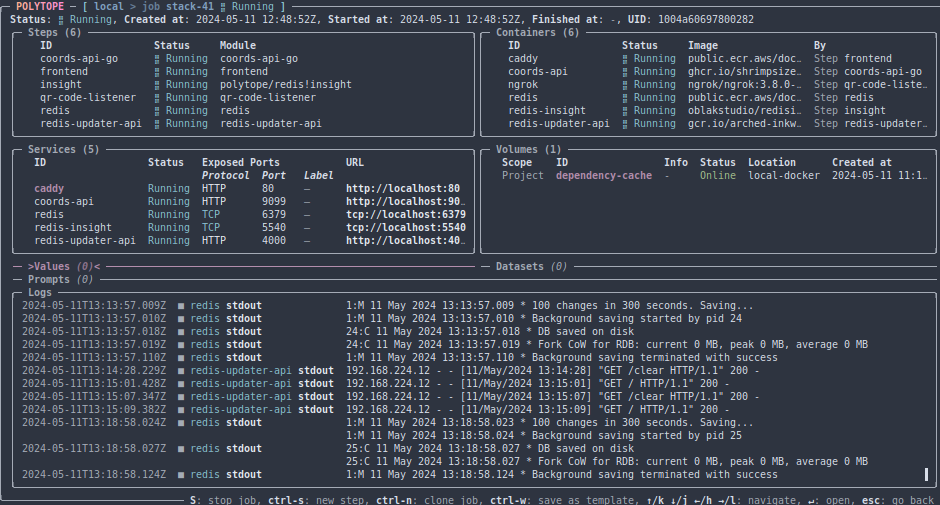
Polytope CLI running the stack
Technically, you don’t need many services for something as simple as this, as you can probably pack everything in one simple service, but since my goal was to play around with polytope, I gave in to the idea of overengineering this. So, I decided to:
- use Redis for storing pixels and their colors, utilizing TTL on keys to make the pixels “disappear”
- write a simple HTML+vanilla js “frontend” that would update the canvas every second and draw the active pixels. This frontend is served with Caddy
- use a small Golang service as a backend that reads data from Redis and is queried by my frontend. Recent changes in the standard
net/httppackage make it simple to run - write a plain HTTP webserver (using just the standard Python library) to trigger redis updates
- use ngrok so that when I run everything on my laptop I still have the ability to change pixels by hitting an endpoint. Ngrok recently released free static domains for all ngrok users so I just need to generate one QR code and that’s it. The ngrok tunnel triggers the redis updater

Overall project structure
Once again, this probably can be served by a single service that does all the calculations in place and has an in-memory storage to track the pixels, but I wanted to see what polytope can do for me, and I’m quite impressed!
Technicalities
The polytope stack file defines a set of services in a template and those in turn use modules defined in the same file:
templates:
- id: stack
  run:
    - qr-code-listener
    - redis
    - polytope/redis!insight
    - redis-updater-api
    - coords-api-go
    - frontend
modules:
- id: qr-code-listener
  module: polytope/ngrok
  args:
    image: ngrok/ngrok:3.8.0-alpine
    env: []
    entrypoint: ngrok
    cmd:
      - start
      - "--all"
    mounts:
      - path: /home/ngrok/.config/ngrok/ngrok.yml
        source: {path: conf/ngrok.yml, type: host}

- id: redis
  module: polytope/redis
  args:
    services:
    - id: redis
      ports:
      - {protocol: tcp, port: 6379}

- id: redis-updater-api
  module: polytope/python
  args:
    id: redis-updater-api
    image: gcr.io/arched-inkwell-420116/python:3.11.8-slim-bookworm
    code:
      type: host
      path: ./code/redis-updater
    cmd: ./bin/run
    restart:
      policy: on-failure
    services:
      - id: "redis-updater-api"
        ports: [{protocol: http, port: 4000}]
    env:
      - {name: REDIS_URL, value: 'redis://redis:6379/0'}
      - {name: PORT, value: 4000}
    mounts:
      - path: /root/.cache/
        source:
          type: volume
          scope: project
          id: dependency-cache

- id: coords-api-go
  info: The Coords API in go
  module: polytope/container
  args:
    env:
    - {name: PORT, value: 9099}
    - {name: REDIS_URL, value: 'redis://redis:6379/0'}
    image: ghcr.io/shrimpsizemoose/coords-api:0.1.0
    services:
    - id: coords-api
      ports:
      - {protocol: http, port: 9099}

- id: frontend
  module: polytope/caddy
  args:
    mounts:
      - path: /usr/share/caddy
        source: {path: code/frontend, type: host}
I find this structure very easy to follow and modify if necessary. You can clearly see the env params, images it uses and can figure out what are the parameters for paths and sources. Moreover, since you can define multiple templates, it’s more convenient to use than the docker-compose (even though under the hood it’s the same technology). The Polytope CLI provides an easy way to read the logs, attach to running containers, restart them, and review parameters, volumes, and services defined in the polytope.yml.
Data model
The coordinates are stored as Hashmap type in Redis and we need two separate structures to serialize/deserialize them
type CoordsResponse struct {
	X     int    `json:"x"`
	Y     int    `json:"y"`
	Color string `json:"color"`
	Draw  bool   `json:"draw"`
}

type CoordsRedis struct {
	X     int    `redis:"x"`
	Y     int    `redis:"y"`
	Color string `redis:"color"`
	Draw  bool   `redis:"draw"`
}
The Python end of that side can be just a dictionary that can be in turn loaded to redis using HSET and EXPIRE if we need to have it disappear after a while
data[y, x] = {
    'x': x,
    'y': y,
    'color': color,
    'draw': int(draw)
}
The JS side is nothing to write home about as well, it parses the values using the provided settings and :
data.coords.forEach(item => {
  ctx.fillStyle = item.color;

  const x = item.x * cw + p;
  const y = item.y * cw + p;

  if (item.draw) {
    ctx.fillRect(x, y, cw, cw);
  }
});
And the coords themselves are defined in a separate file as a map of colored pixels:
def draw_moose():

    P = "pink"
    K = "black"
    W = "#904007"
    Y = "#d0925e"
    _ = None

    coords = [
        [_, Y, _, _, _, _, _, _, _, _, _, _, Y, _],
        [Y, _, _, Y, _, _, _, _, _, _, Y, _, _, Y],
        [Y, Y, Y, _, _, _, _, _, _, _, _, Y, Y, Y],
        [_, Y, Y, _, _, _, _, _, _, _, _, Y, Y, Y],
        [_, Y, Y, _, _, W, _, _, _, W, _, Y, Y, _],
        [Y, Y, Y, Y, W, W, W, W, W, Y, Y, Y, Y, Y],
        [_, _, _, _, W, K, W, K, W, Y, _, _, _, _],
        [W, W, W, W, W, W, W, W, W, W, _, _, _, _],
        [W, W, W, W, W, W, W, W, W, W, _, _, _, _],
        [W, P, W, P, W, W, W, W, W, W, _, _, _, _],
        [W, W, W, W, W, W, W, W, W, W, _, _, _, _],
        [W, W, W, W, W, W, W, W, W, W, _, _, _, _],
        [W, W, W, W, W, W, W, W, W, W, W, W, W, W],
        [_, _, _, _, W, W, W, W, W, W, W, W, W, W],
        [_, _, _, _, W, W, W, W, W, W, W, W, W, W],
        [_, _, _, _, W, W, W, W, W, W, W, W, W, W],
        [_, _, _, _, _, W, _, W, _, _, _, W, _, W],
        [_, _, _, _, _, W, _, W, _, _, _, W, _, W],
    ]

    return coords
The moose pixel art is from Pixel People.
Language-wise, the Python part gave me the most trouble to set up, but it was mainly because I don’t like poetry (just personal preferences, the tool is fine). It actually turned out later that you can actually use requirements args with syntax like pt run 'polytope/python{requirements: {type: string, data: ipython}, cmd: ipython} or pt run 'polytope/python{requirements: type: host, requirements.txt}, cmd: my-script} and I think it’s cool that the tool allows you such flexibility! Since the polytope devs told me that, I think it also highlights the importance of documenation, I guess 😈. Aside from the standard Python library, the only dependency here is redis lib, so next time I do something with Python and polytope, I’ll definitely try running my scripts this way.
Anyway, here’s the code in a github repo. Feel free to ping me in discussions or on LI
🫎🤠